
App Info
The first step in creating your project is describing your app and selecting an application icon.
Basic App Information
App Name
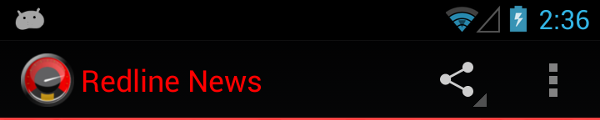
The App Name is the name that will be shown on the action bar on top of the dashboard and underneath your app icon. Below is an example using the App Name "Redline News."
App Version
The version number allows you to keep track of releases of your app. Once you release your app to the public you will want to increment this version number each time you distribute a new version (1.0.0, 1.0.1 etc.). If your app is in Google Play, this will let people know that a new version is available.
Target Market
Use this setting in order to build a version of your app that will target a specific marketplace. The setting controls destination links for Google Play activities, PDF dependencies, share text, etc. so they point to either Google Play or the Amazon Appstore. More information can be found in the Making Kindle Fire apps with Andromo knowledge base article.
- Google Play: Android Phones and Tablets – Select this when you are building your app for distribution in Google Play. Share links and Google Play activities will always use Google Play links.
- Amazon Appstore: Kindle Fire and Kindle Fire HD – Select this when you are building your app for distribution through the Amazon Appstore. Share links and Google Play activities will use Amazon Appstore links. Note: This must be selected for approval in the Amazon Appstore.
- Samsung Apps: Android Galaxy devices – Select this when you are building your app for distribution through the Samsung Apps app store. Share links and Google Play activities will use Samsung Apps links. Note: The Samsung Apps store only allows deep linking using package names, the “Showing all of your Apps” and "Using a General Search Query" Google Play Activity options are not supported when targeting Samsung apps.
Category
This describes what category your app falls into. Choose the category name that best describes the content in your app.
Package Name
This allows you to select which default package name will be used for the app.
Switching between the standard and alternate package names can be useful if you want to build a second version of your app with small modifications -- for example, an ad-free version of your app. It can also be useful if you need to relaunch your project as a "new" app in Google Play, with a different package name.
What is a package name?
The package name is a string of text that serves as a unique identifier for the app. For example, the package name is used in the URL when linking to an app in Google Play.
Each app in Google Play must have its own package name. Once an app has been uploaded to Google Play, its package name is "locked in" forever -- you will always need to use that same package name to update the app, and no other app will be able to use that package name.
If you changed the package name and rebuilt the app, Google Play would see it as a different app, because of the package name.
When you start an Andromo project, two unique package names are generated for you. The default package names begin with either "com.andromo" or "net.andromo" followed by a unique developer id and project id.
You can override the default package names if you are on the Professional subscription plan:
Professional Features
This section contains professional features. They can only be used if you have a Professional subscription.
Custom Package Name
Only available with a Professional subscription.
WARNING: Leave this blank unless you are 100% sure of what you are doing and why you are doing it.
Anything you enter will be used as the package name for your Android app. More information on this setting can be found in the package section of the Android Manifest documentation:
A full Java-language-style package name for the application. The name should be unique. The name may
contain uppercase or lowercase letters ('A' through 'Z'), numbers, and underscores ('_'). However, individual
package name parts may only start with letters.
To avoid conflicts with other developers, you should use Internet domain ownership as the basis for your
package names (in reverse). For example, applications published by Google start with com.google. You
should also never use the com.example namespace when publishing your applications.
Caution: Once you publish your application, you cannot change the package name. The package name
defines your application's identity, so if you change it, then it is considered to be a different application
and users of the previous version cannot update to the new version.
It is not necessary to change the package name, and most users will never see the package name. However if you want to change your package name to follow package naming conventions or change it for a customer you can.
You also must avoid reserved Java keywords when creating your package name. You can find a list of these in the Java Language Keywords topic. If your package name includes any of these, it will fail during the build process.
If you leave this field blank Andromo will use a default package name in this format:
com.andromo.devXXXX.appYYYY
Where XXXX is your User ID, and YYYY is the Project ID.
Note: If you change your package name while you have a Professional subscription and then let your Professional subscription expire, you will not be able to update your app in Google Play, as the package name will revert to the default. Change this value with care.
Show Customized Text on About Dialog
Only available with a Professional subscription.
Allows you to show custom text that will appear on the About dialog, which is accessible from the overflow menu on the app bar (in the top right corner of the screen).
Enabling this option displays the About Dialog Text field where you can enter the custom dialog text.
About Dialog Text
The text you want to show on the About dialog. This can be useful for showing simple instructions, listing credits for the content you've used, or describing the changes in the latest version of your app.
This text supports some very basic HTML markup: <b> for bold, <i> for italic, and <a> for hyperlinks. (No other HTML is supported.)
Note: the user will be able to scroll the text if you enter more text than will fit on the About dialog at once.
License Agreement
Show License Agreement
Allows you to show a EULA to your users that they must accept before running your app. The dialog is shown when the user launches your app for the first time. If the user declines, the app with exit. See example screenshot below.
License Title
The title to show on the license agreement dialog.
License Text
The text you want to show on the license agreement dialog.
This text supports some very basic HTML markup: <b> for bold, <i> for italic, and <a> for hyperlinks. (No other HTML is supported.)
Example License Dialog
Below is an example of how the dialog looks with some sample license text:
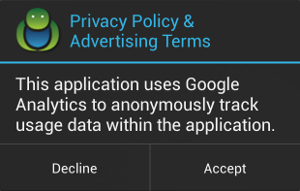
Launch Notice (EU User Consent Notice)
Show Launch Notice
Allows you to show a one-time notice the first time your app is launched. You can choose whether to show the notice anywhere in the world, or only within countries that are part of the European Union where an "EU Cookie Notice" needs to be shown.
You should use this to comply with EU privacy laws which require that you get consent or inform your users about any data collection, sharing, or usage that takes place within your app. See: EU User Consent.
The Launch Notice dialog is shown when the user launches your app for the first time. If Show License Agreement is enabled, the launch notice will be shown after the license agreement has been accepted.
Notice Title
The title to show on the launch notice dialog.
Notice Text
The text you want to show on the launch notice dialog.
This text supports some very basic HTML markup: <b> for bold, <i> for italic, and <a> for hyperlinks. (No other HTML is supported.)
European Union countries only (uncheck for Worldwide)
Allows you to restrict the launch notice to only be shown in countries that are part of the European Union where EU User Consent is required. If this option is unchecked, the launch notice dialog will be shown anywhere in the world.
The app will attempt to determine the user's country by using one of these methods, in the following order:
1. If it is a GSM phone, it will use the MCC reported by the mobile network (cell phone service provider).
2. If that fails, and an internet connection is available, it will perform an IP lookup.
3. If that fails, it will make an assumption based on the device language settings.
The check for the end user's country will not be repeated; once a country has been determined, that country will be used in the future, until the app is uninstalled or its data cache is cleared.
Example Launch Notice
Below is an example of how the dialog looks with some sample notice text:

App Icon
The app icon allows users to easily identify your app on their phone/tablet in order to run it. It's shown in various places, such as their apps list, and when they're managing their applications. See example images below for the "Redline News" app icon.
<img src="/help/assets/1f44e78dbb7a59f7a43b8fc6b59f21b4645929a2/app_info_home_screen_framed_normal.png" width="40%" height="40%">
<img src="/help/assets/9785495642177d861cf8fc55e8a8c5a1ea0bcee8/app_info_app_list_framed_normal.png" width="40%" height="40%">